This page details the application named Ecommerce Orders for IntelliDealer Import created in-house and intended to be used to expedite processing ecommerce orders.
- 1. Installing the App
- 2. Downloading Order Files
- 3. Processing the Files
- 4. Settings Configuration
- 5. Sending to IntelliDealer
Ecommerce Orders for IntelliDealer Import App - Installation

2. Click Here to download the latest version of the app.
3. Once the download finishes, click "EcommerceOrdersInstaller.zip file to open it.

4. The Zip file should open in WinRAR. A purchase notice will appear. Click X to close it.

5. Click the "EcommerceOrdersInstaller.exe" file

6. Click "Extract To"

7. Click the "Downloads" folder (or any folder you wish to extract it to).

8. Click "OK" to extract the file.

9. Navigate to the "Downloads" folder (or whichever folder you extracted the file to).

10. Double-click the EcommerceOrdersInstaller file to start the install process.

11. Click the Next button.

12. Click the Next button again.

13. Click the Install button.

14. Click the Finish button to complete the app installation.

15. Click the search icon in the menu bar.

16. Search for "ecommerce" and the app should appear. Click it to launch it.

17. Right click on the app on the menu bar.

18. Click Pin to Taskbar to make the application always accessible from here.

Made with Scribe
Ecommerce Orders for IntelliDealer Import App - Downloading Order Files
1. From the website admin area, on the menu bar under Woocommerce, click "Export".

2. First make sure the Format field is set to Processing and On Hold Orders with Div.

3. Click the field and choose that option if it's not set already.

4. Uncheck the Mark as exported option.

5. Click the Order statuses field, which is blank by default.

6. Choose Processing from the list.

7. Click into the field again to select another value.

8. Click the On hold option.

9. Click the Export button to now export the file which will contain all orders with Processing and On Hold status.

10. You will see the Export being processed.

11. When it's completed downloading, you will see it in the Downloads folder.

12. Click the Done button to finish the Export on the website.

13. Now navigate to eBay.

14. Click the Downloads button under Reports.

15. If a popup window appears, you can click to say Don't show me this again.

16. Click "Get started" to close the popup window.

17. Click "Download report"

18. Click "Source Select report source"

19. Click "Orders"

20. Click "Type Select report type"

21. Click "Awaiting shipment"

22. Click "Download"

23. You will see a message that the report is being created.

24. When the report is completed, it will appear in the Downloads folder.

25. Now both the website and eBay orders that need processed have been downloaded into these two files that will next be used in the app.
Made with Scribe
Ecommerce Orders for IntelliDealer Import App – Processing Files
1. Click the Process Web Orders button.

2. Browse to the file exported for the web orders needing processed and click on it..

3. Click "Open".

4. Click the Process eBay Orders button.

5. Click the file exported for the eBay orders needing processed.

6. Click "Open".

7. You should see a message in the log that both files have been processed successfully.

8. You should see in the same folder that the files were processed in (typically the Downloads folder), a new folder "web-orders" and "ebay-orders".

9. If you look in each folder, you will see a file for each order to process. Here is an example of the web-orders folder. The filename structure is "Div - Order # - Sale Date - Customer Name". So for instance, 1 - 793103 - 2025-05-24 - SANDRA KEENEY" is a sale for Rochester (Div # 1), for order # 793103, purchased 5/24/25, by the customer Sandra Keeney. When the Div is 0, that means that the order has not been assigned to any location yet.

10. Here is the ebay-orders folder containing the orders to process. The filename structure here is similar to the web-orders folder where it is "Div - Order # - Sale Date - Customer Name".

11. Now that a file has been created for each order to process, in the next step we will see how to use these to speed up the invoicing process in IntelliDealer.
Made with Scribe
Ecommerce Orders for IntelliDealer Import App – Settings
1. Next, we will look at the Settings button, as this needs to be configured prior to using the Send to IntelliDealer option. Click the Settings button to go to it.

2. Here you will see the various settings that can be configured:
- eBay Customer ID - Should be the IntelliDealer customer # used for eBay orders
- Website Customer ID - Should be the IntelliDealer customer # used for web orders

3. Fixed Positioning: Check this option if you intend to always have the Parts Invoicing page in the same position on the screen when processing orders. This can be done by maximzing the Parts Invoicing window, or making it always take up the same half of the screen. Checking this option will make the order process run the best.
By not checking this option, you would need to always put your mouse in a certain spot that we will see later to make the Send to IntelliDealer option work properly, which can be more cumbersome.

4. Mouse Positioning Fields: These are the x and y coordinates of the screen for each field on the Parts Invoicing screen to reference by. Use a program like MPos to find these values.

5. Here is where to put your mouse in the highlighted areas for each Mouse Positioning field on the Customer screen. You can see using the MPos app what the x and y coordinates are for each field when the mouse is in that position.

6. Here is similarly where to put your mouse in the highlighted areas for each Mouse Positioning field on the Details screen.

7. eBay Free Freight Surcharge: This is the amount used in eBay to account for freight with listings that have Free Shipping. The Send to IntelliDealer option will make this calculation for processing properly in IntelliDealer.

8. Once the values are entered, click the Save Settings button to save them.

9. Click the Go Back button to return to the main screen. You will see a record on the screen that says the settings were saved.

Made with Scribe
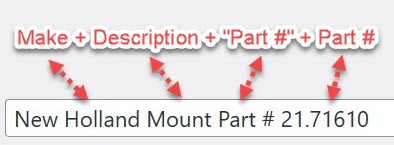
Sample Description
Step 1 – Installing the App
Ecommerce Orders for IntelliDealer Import App – Installation

2. Click “Download the Ecommerce Orders for IntelliDealer Import App”

3. Once the download finishes, click “EcommerceOrdersInstaller.zip file to open it.

4. The Zip file should open in WinRAR. A purchase notice will appear. Click X to close it.

5. Click the “EcommerceOrdersInstaller.exe” file

6. Click “Extract To”

7. Click the “Downloads” folder (or any folder you wish to extract it to).

8. Click “OK” to extract the file.

9. Navigate to the “Downloads” folder (or whichever folder you extracted the file to).

10. Double-click the EcommerceOrdersInstaller file to start the install process.

11. Click the Next button.

12. Click the Next button again.

13. Click the Install button.

14. Click the Finish button to complete the app installation.

15. Click the search icon in the menu bar.

16. Search for “ecommerce” and the app should appear. Click it to launch it.

17. Right click on the app on the menu bar.

18. Click Pin to Taskbar to make the application always accessible from here.

Made with Scribe
Step 2 – Downloading Order Files
Ecommerce Orders for IntelliDealer Import App – Downloading Order Files
1. From the website admin area, on the menu bar under Woocommerce, click “Export”.
2. First make sure the Format field is set to Processing and On Hold Orders with Div.
3. Click the field and choose that option if it’s not set already.
4. Uncheck the Mark as exported option.
5. Click the Order statuses field, which is blank by default.
6. Choose Processing from the list.
7. Click into the field again to select another value.
8. Click the On hold option.
9. Click the Export button to now export the file which will contain all orders with Processing and On Hold status.
10. You will see the Export being processed.
11. When it’s completed downloading, you will see it in the Downloads folder.
12. Click the Done button to finish the Export on the website.
13. Now navigate to eBay.
14. Click the Downloads button under Reports.
15. If a popup window appears, you can click to say Don’t show me this again.
16. Click “Get started” to close the popup window.
17. Click “Download report”
18. Click “Source Select report source”
19. Click “Orders”
20. Click “Type Select report type”
21. Click “Awaiting shipment”
22. Click “Download”
23. You will see a message that the report is being created.
24. When the report is completed, it will appear in the Downloads folder.
25. Now both the website and eBay orders that need processed have been downloaded into these two files that will next be used in the app.
Made with Scribe
Step 3 – Processing Files
Ecommerce Orders for IntelliDealer Import App – Processing Files
1. Click the Process Web Orders button.
2. Browse to the file exported for the web orders needing processed and click on it..
3. Click “Open”.
4. Click the Process eBay Orders button.
5. Click the file exported for the eBay orders needing processed.
6. Click “Open”.
7. You should see a message in the log that both files have been processed successfully.
8. You should see in the same folder that the files were processed in (typically the Downloads folder), a new folder “web-orders” and “ebay-orders”.
9. If you look in each folder, you will see a file for each order to process. Here is an example of the web-orders folder. The filename structure is “Div – Order # – Sale Date – Customer Name”. So for instance, 1 – 793103 – 2025-05-24 – SANDRA KEENEY” is a sale for Rochester (Div # 1), for order # 793103, purchased 5/24/25, by the customer Sandra Keeney. When the Div is 0, that means that the order has not been assigned to any location yet.
10. Here is the ebay-orders folder containing the orders to process. The filename structure here is similar to the web-orders folder where it is “Div – Order # – Sale Date – Customer Name”.
11. Now that a file has been created for each order to process, in the next step we will see how to use these to speed up the invoicing process in IntelliDealer.
Made with Scribe
Step 4 – Settings
Ecommerce Orders for IntelliDealer Import App – Settings
1. Next, we will look at the Settings button, as this needs to be configured prior to using the Send to IntelliDealer option. Click the Settings button to go to it.
2. Here you will see the various settings that can be configured:
- eBay Customer ID – Should be the IntelliDealer customer # used for eBay orders
- Website Customer ID – Should be the IntelliDealer customer # used for web orders
3. Fixed Positioning: Check this option if you intend to always have the Parts Invoicing page in the same position on the screen when processing orders. This can be done by maximzing the Parts Invoicing window, or making it always take up the same half of the screen. Checking this option will make the order process run the best.
By not checking this option, you would need to always put your mouse in a certain spot that we will see later to make the Send to IntelliDealer option work properly, which can be more cumbersome.
4. Mouse Positioning Fields: These are the x and y coordinates of the screen for each field on the Parts Invoicing screen to reference by. Use a program like MPos to find these values.
5. Here is where to put your mouse in the highlighted areas for each Mouse Positioning field on the Customer screen. You can see using the MPos app what the x and y coordinates are for each field when the mouse is in that position.
6. Here is similarly where to put your mouse in the highlighted areas for each Mouse Positioning field on the Details screen.
7. eBay Free Freight Surcharge: This is the amount used in eBay to account for freight with listings that have Free Shipping. The Send to IntelliDealer option will make this calculation for processing properly in IntelliDealer.
8. Once the values are entered, click the Save Settings button to save them.
9. Click the Go Back button to return to the main screen. You will see a record on the screen that says the settings were saved.